Create in-game assets
Estimate time to complete: 20 minutes
This tutorial covers one of the most important parts in constructing your web3 game. Here you will mint, and configure NFTs to power your in-game items. As part of this, you'll learn how to do this with our preset contracts for ERC721..
Note: This tutorial will only cover minting and will not cover when and how you would initiate a mint within a gameplay context.
This is a beginners guide, lots of the helpful context, important links and preparation material are in the blue collapsed sections. For those more confident, you can skip those.
We cover minting NFTs by contract function call and Minting API. For more information on the Minting API, check out our following product page.
To start, you may want to first familiarise yourself with these concepts
Task 1: Set up basic metadata hosting
To enable NFTs to be more descriptive, metadata is used to contain information about the special characteristics of each token. This can include its name, description, transaction history, traits, link to the hosted image, and more.
At scale, you will need to provide this information through a server, but we'll use Github Pages today to minimize the infrastructure setup. Begin by forking our Sample Project Metadata repository:

Sample Project Metadata
You should now have your very own repository! Next, we need to make this repository visible through Github Pages:
- Your Repository > Settings > Pages
- Set the Source to "deploy from a branch".
- Set the Branch to
mainormasterbranch and click save.
Visual guide for setting up your Metadata repo
Task 2: Customise your NFT metadata
We've already provided you with 3 sample metadata files and images out of the box - let's make a few quick changes to customise your collection!
The minimum files you'll need to update are:
- Metadata files in the ../tokens/ directory: URLs for your images for each NFT (file name contains Token ID value: e.g. 1, 2, 3) under the
imagefield; replacing thehttps://immutable.github.io/sample-project-metadata/tokens/token1.webp,../tokens/token2.webpand../tokens/token3.webpvalues from the 3 samples provided. - collection.json: Name of your collection under the
nameanddescriptionfields. Also populate the collection image URL under theimagefield
https://<your github name>.github.io/<your fork name>/<directory>/<filename>{
"name": "YOUR_COLLECTION_NAME",
"description": "YOUR_COLLECTION_DESCRIPTION",
"image": "YOUR_IMAGE_URL",
"external_link": "YOUR_WEBSITE_URL"
}
To modify the metadata of the individual NFTs, we need to modify the json files in the /tokens folder. You'll note that the files are named 1, 2 and 3: this corresponds exactly to the unique token_id of each token. NFT metadata follows the standard defined by Opensea, and should look like this:
{
  "id": 1,
  "image": "YOUR_IMAGE_URL",
  "token_id": "1",
  "background_color": null,
  "animation_url": null,
  "youtube_url": null,
  "name": "Test zkEVM NFT",
  "description": "This NFT is my first zkEVM NFT created on Immutable",
  "external_url": null,
  "attributes": [
    {
      "trait_type": "Hat",
      "value": "Top Hat"
    },
    {
      "trait_type": "Coat",
      "value": "Tails"
    },
    {
      "trait_type": "Neck",
      "value": "Bow Tie"
    },
    {
      "display_type": "number",
      "trait_type": "Level",
      "value": 1
    }
  ]
}
As you've probably noticed, modifying this metadata for each NFT individually is slow and frustrating. This is OK for our quickstart tutorial, but is not recommended for real games! If you want to learn how to set up metadata hosting at scale, see our metadata documentation.
We now have two very important URLs - remember these for later!
- Contract Metadata URI:
https://<your github name>.github.io/<your fork name>/collection.json - Token Base URI:
https://<your github name>.github.io/<your fork name>/tokens/
Blockscout currently requires a '/' at the end of the Token Base URI to index metadata correctly. Immutable's Blockchain Data API does not require this, however for consistency we recommend adding a '/' to the end of the Token Base URI for Blockscout compatibility.
Task 3: Setup admin wallet
For the purpose of this tutorial, all you'll need to do is download the Metamask browser wallet and follow the steps to store your seed phrase in a safe location.
Immutable Hub will take care of setting up the chain network details and faucet the tIMX tokens (for Testnet only) you'll need to pay for gas automatically in Task 4 as you deploy your contract.
If you need to manually top up your tIMX tokens you can do so via Immutable Hub by visiting the Faucet.
Task 4: Deploy ERC-721 preset contract
Go to the project you've previously set up in Immutable Hub.
Connect your minting Metamask wallet by clicking the Connect Wallet button on the top right menu of the Immutable Hub and navigate to your project and environment.
In the Collections submenu, click Deploy contract:
- Create a Name for your collection
- Create a Symbol for your collection that is 2-3 characters long
- Paste the
Token Base URIfrom above into theBase URIfield - Paste the
Contract Metadata URIfrom above into theCollection Metadata URIfield
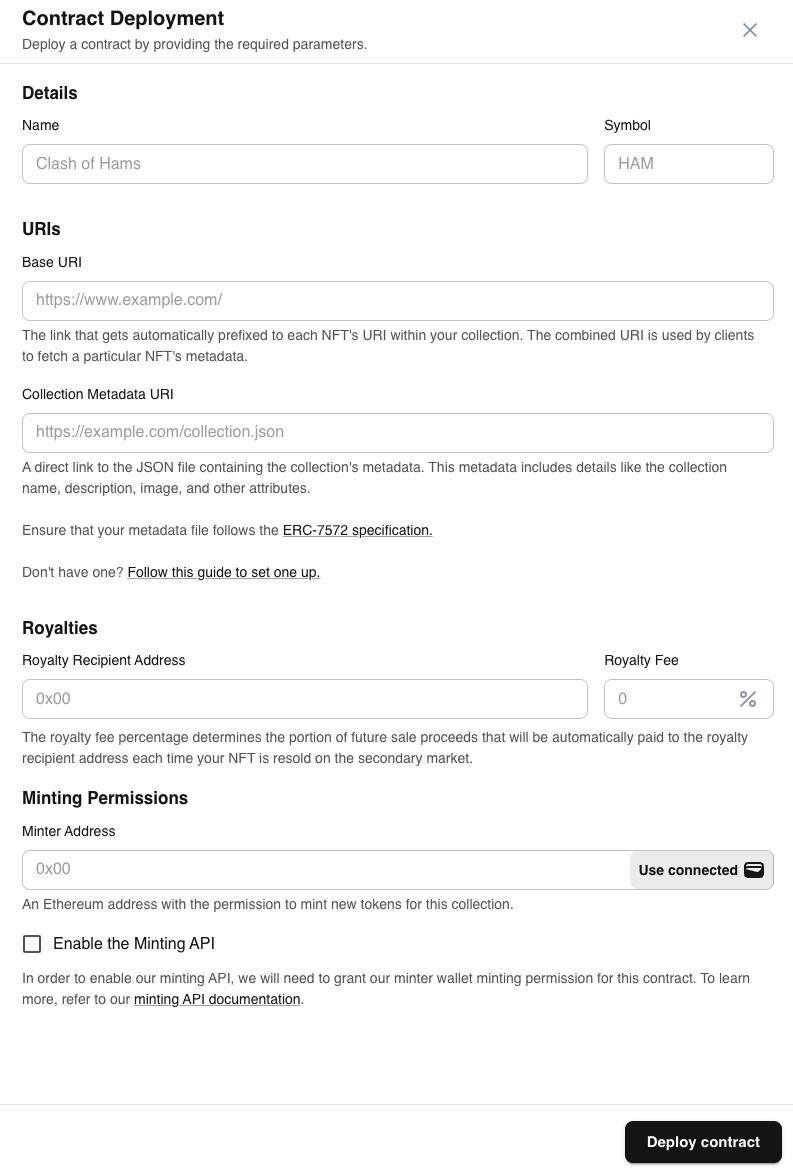
- Enter the wallet address you created earlier as the royalty recipient
- Enter
5for Royalty fee. For the purpose of this tutorial, we will set royalty to be 5% default. - Click on the
Use connected walletbutton forMinter Address. This will automatically populate the field with your connected wallet address, allowing it to mint tokens. Alternatively, you can enter the address of another wallet. - If you want to use the Minting API, check the
Enable Minting APIcheckbox. - Click
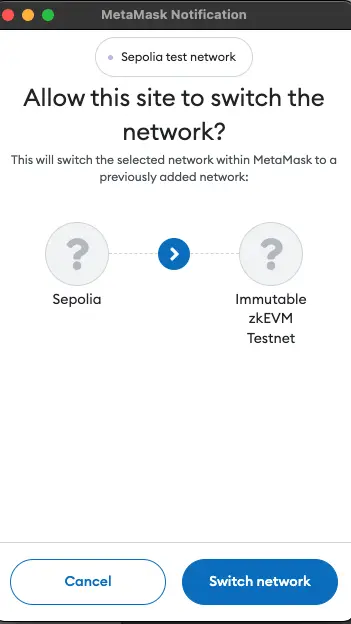
Deploy - Immutable Hub will automatically check your wallet's connected network. If your network is not already connected to the respective chain (IMX zkEVM Testnet or IMX zkEVM Mainnet), then you will prompted in Metamask to switch. Here, select
Switch Network. If you are deploying on Testnet,tIMXwill be automatically given to you via our faucet as part of the process.
- You will be prompted to sign a transaction with your wallet. This step costs gas and will deploy your contract.
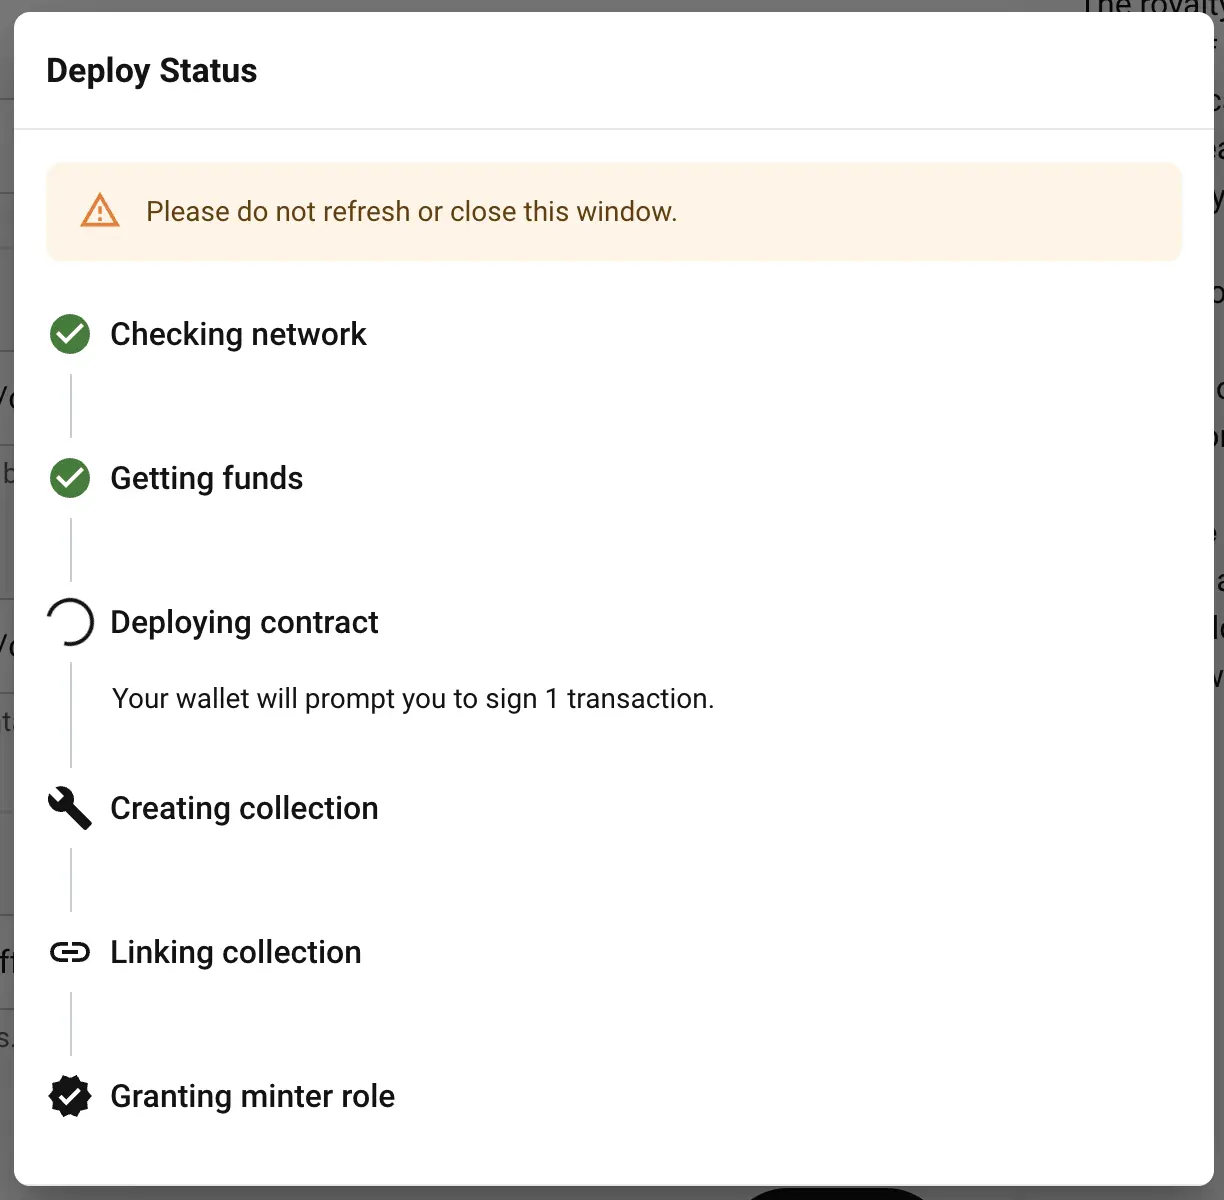
- You will be prompted to sign a message with your wallet. This step is gasless and will link your collection to your project's environment.

- Finally, you will be prompted to sign a transaction with your wallet. This step costs gas and will assign your wallet the minter role, so that you can mint tokens on the collection.
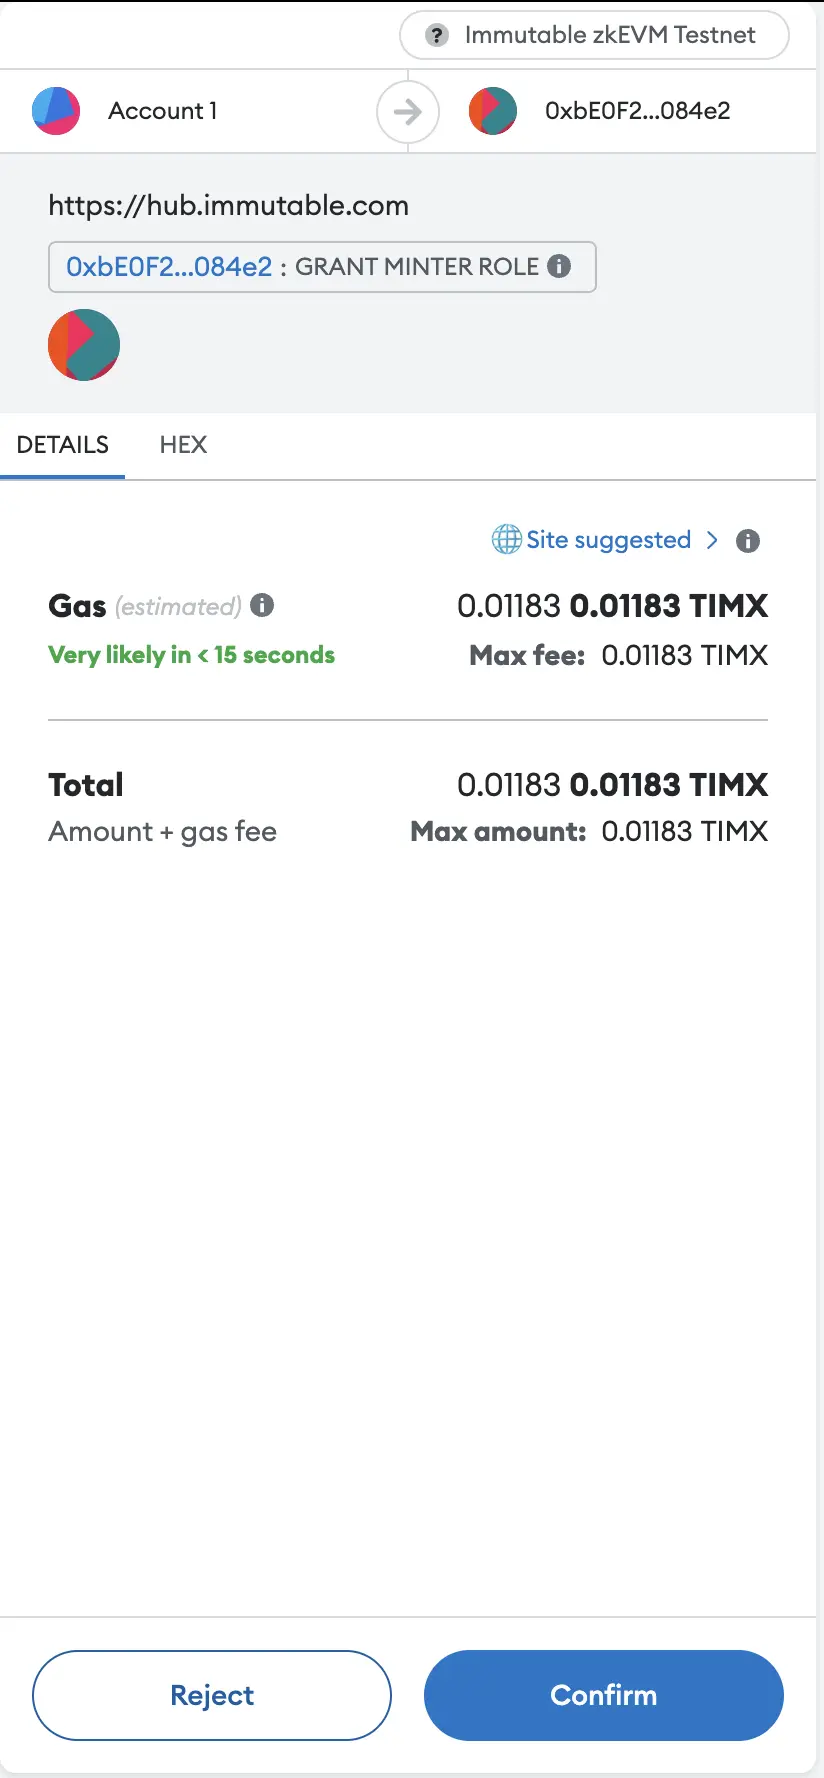
- Set up your admin wallet and the zkEVM Testnet Network by following instructions here
- Follow instructions on deploying your contracts via code and request to be allowlisted
To make sure that creators receive their hard earned loyalties, Immutable requires that all collections of ERC-721/1155s deployed on Immutable zkEVM implement the Operator Allowlist. Not implementing will have these effects for your collection (i.e. ERC-721/1155s):
- You may forfeit any token grants you may have received.
- Passport users will receive a warnings that your collection is likely to be counterfeit.
- Your collection will not appear on any of the 3rd party marketplaces in our ecosystem.
For more information on the Operator Allowlist, please see this guide.
Task 5: Mint tokens
You can mint tokens in three different ways: via a contract function call, via the Minting API with a reference ID, or via the Minting API with a token ID. Select the option that best suits your needs below:
- Minting API - Gas Efficient
- Minting API with Token ID
- NEW - Minting Backend SDK (Node.js)
- Contract Function Call
Th Minting API is now available for all game studios and users with Hub accounts. See rate limits for more details.
The Minting API is available to all developers using Immutable's ERC721 and ERC1155 preset contracts.
The Minting API allows you to mint NFTs along with associated metadata through a straightforward API call.
This option uses mintBatchByQuantity() function which is the most gas efficient method for minting.
The assets token_id is generated by the platform and published via the Blockchain Data API once the mint is completed.
For testing the Minting API, we suggest using an API platform such as Postman.
To expedite your integration, check out our sample server code in the Minting Backend SDK tab above.
The following fields will be required to use the Minting API:
CONTRACT_ADDRESS- The contract address of your collection - you can find this on Immutable Hub.SECRET_API_KEY- Secret key for your environment obtained from your Hub account. Follow this guide to set yours up. This is not your wallets private key.REFERENCE_ID_ONE- The internal content creator reference ID of the first asset being minted. This internal ID is used to link the request to the system-generated token ID. Each number must be unique for each collection's successful mints.REFERENCE_ID_TWO- The internal content creator reference ID of the second asset being minted. This internal ID is used to link the request to the system-generated token ID. Each number must be unique for each collection's successful mints.RECIPIENT_ONE- The first address of the wallet that will own the NFTs being minted in the batch.RECIPIENT_TWO- The second address of the wallet that will own the NFTs being minted in the batch.
5.1.1: Authorizing Minting API for collection minting
Enable Minting API checkbox checked, this will already have been done for you. If not, you can follow the steps below.The initial step involves authorizing the Minting API to perform minting operations for your collection. This is done by giving the Minting API the minter role.
Our sample project contains a script to assist with this step. First, clone our sample project and instantiate it:

Basic Preset Minting
git clone https://github.com/immutable/basic-preset-minting
cd basic-preset-minting
npm i
Then run the following command:
npm run grant-role-minting-api
5.1.2: Minting assets with metadata: Minting without token_id for maximum gas efficiency
In this example, we will mint 2 NFTs destined for 2 different recipients.
It's important to note that every minting request through the Minting API must include an internal, unique reference_id. Once a mint is successful, this reference_id cannot be reused for additional mints within the same collection.
- SDK
- API
const chainName = 'imtbl-zkevm-testnet';
const contractAddress = CONTRACT_ADDRESS;
const response = await client.createMintRequest({
  chainName,
  contractAddress,
  createMintRequestRequest: {
    assets: [
      {
        owner_address: RECIPIENT_ONE,
        reference_id: REFERENCE_ID_ONE,
        metadata: {
          image:
            'https://immutable.github.io/sample-project-metadata/tokens/token1.webp',
          animation_url: null,
          youtube_url: null,
          name: 'Test zkEVM NFT #1',
          description:
            'This NFT is my first zkEVM NFT created on Immutable',
          external_url: null,
          attributes: [
            {
              trait_type: 'Hat',
              value: 'Top Hat',
            },
            {
              trait_type: 'Coat',
              value: 'Tails',
            },
            {
              trait_type: 'Neck',
              value: 'Bow Tie',
            }
          ]
        }
      },
      {
        owner_address: RECIPIENT_TWO,
        reference_id: REFERENCE_ID_TWO,
        metadata: {
          image:
            'https://immutable.github.io/sample-project-metadata/tokens/token2.webp',
          animation_url: null,
          youtube_url: null,
          name: 'Test zkEVM NFT #2',
          description:
            'This NFT is my second zkEVM NFT created on Immutable',
          external_url: null,
          attributes: [
            {
              trait_type: 'Hat',
              value: 'Top Hat',
            },
            {
              trait_type: 'Coat',
              value: 'Tails',
            },
            {
              trait_type: 'Neck',
              value: 'Bow Tie',
            }
          ]
        }
      }
    ]
  }
});
POST {baseURL}/v1/chains/{chain_name}/collections/{contract_address}/nfts/mint-requests
5.1.3: Retrieving the Token ID
Execute the following command to retrieve the token_id of your newly minted NFT:
- SDK
- API
const chainName = 'imtbl-zkevm-testnet';
const contractAddress = CONTRACT_ADDRESS;
const referenceId = REFERENCE_ID_ONE;
const response = await client.getMintRequest({chainName, contractAddress, referenceId});
GET {baseURL}/v1/chains/{chain_name}/collections/{contract_address}/nfts/mint-requests/{reference_id}
If the status in the results is "pending", wait a few seconds and try again. Once the mint is successful, the status will change to "succeeded".
The returned results should resemble the following sample, with the status indicating "succeeded" to confirm the successful mint.
{
    "page": {
        "next_cursor": null,
        "previous_cursor": null
    },
    "result": [
        {
            "chain": {
                "id": "eip155:13473",
                "name": "imtbl-zkevm-testnet"
            },
            "collection_address": "0xe2e94d611d50370612e9721254807b7874093fb6",
            "created_at": "2024-02-12T05:35:35.743242Z",
            "error": null,
            "owner_address": "0x68209e7086032941a8Cb14352c2F43b086288791",
            "reference_id": "REFERENCE_ID_ONE",
            "status": "succeeded",
            "token_id": "TOKEN_ID_ONE",
            "activity_id": "4e28df8d-f65c-4c11-ba04-6a9dd47b179b",
            "transaction_hash": "0x6890c450a43e6f3e90b311e2c0e80e1e6880cbc93ab977fc5357ac66cd255800",
            "updated_at": "2024-02-12T05:35:35.743242Z"
        },
    ]
}
Get the corresponding token_id for both REFERENCE_ID_ONE and REFERENCE_ID_TWO.
5.1.4: Updating metadata files
If you've been following this guide, you'll need to update the corresponding metadata file that you set up in Task 2 for each asset.
Here are the changes you need to make:
- Rename the file to match the system-generated
token_idobtained from the previous step. - Update the
idattribute to match the system-generatedtoken_idobtained from the previous step. - Update the
token_idattribute to match the system-generatedtoken_idobtained from the previous step. - Save the file.
For future mints, you can delay Task 2 until you've obtained the token_id.
However, after minting, ensure that the metadata file is created and that the metadata submitted with the mint request matches this file. Some ecosystem partners use the metadata source file rather than the Blockchain Data API. To ensure a consistent experience across the platform, always ensure that the Blockchain Data API and the local metadata file are consistent.
Th Minting API is now available for all game studios and users with Hub accounts. See rate limits for more details.
The Minting API is available to all developers using Immutable's ERC721 and ERC1155 preset contracts.
The Minting API allows you to mint NFTs along with associated metadata through a straightforward API call.
This option uses mintBatch() function which is a less gas efficient method for minting than mintBatchByQuantity(), however allows the minter to specify token_id as part of the mint request. reference_id are required to check the status of the mint request. token_id and reference_id can be the same provided they are unique to the collection.
For testing the Minting API, we suggest using an API platform such as Postman.
To expedite your integration, check out our sample server code in the Minting Backend SDK tab above.
The following fields will be required to use the Minting API:
CONTRACT_ADDRESS- The contract address of your collection - you can find this on Immutable Hub.SECRET_API_KEY- Secret key for your environment obtained from your Hub account. Follow this guide to set yours up. This is not your wallets private key.TOKEN_ID_ONE- The ID of the first NFT your are creating. All NFTs belonging to a single collection must have a uniquetoken_id.TOKEN_ID_TWO- The ID of the second NFT your are creating. All NFTs belonging to a single collection must have a uniquetoken_id.REFERENCE_ID_ONE- The internal content creator reference ID of the first asset being minted. This internal ID is used to link the request to the system-generated token ID. Each number must be unique for each collection's successful mints. Can be the same value astoken_id.REFERENCE_ID_TWO- The internal content creator reference ID of the second asset being minted. This internal ID is used to link the request to the system-generated token ID. Each number must be unique for each collection's successful mints. Can be the same value astoken_id.RECIPIENT_ONE- The first address of the wallet that will own the NFTs being minted in the batch.RECIPIENT_TWO- The second address of the wallet that will own the NFTs being minted in the batch
5.2.1: Authorizing Minting API for collection minting
Enable Minting API checkbox checked, this will already have been done for you. If not, you can follow the steps below.The initial step involves authorizing the Minting API to perform minting operations for your collection. This is done by giving the Minting API the minter role.
Our sample project contains a script to assist with this step. First, clone our sample project and instantiate it:

Basic Preset Minting
git clone https://github.com/immutable/basic-preset-minting
cd basic-preset-minting
npm i
Then run the following command:
npm run grant-role-minting-api
5.2.2: Prepare the assets metadata
Ensure you have completed Task 2 and that your metadata file is saved in your local directory.
Even though you supply metadata with the Minting API request some ecosystem partners index metadata from your local metadata directory.
5.2.3: Minting assets with metadata
In this example, we will mint 2 NFTs destined for 2 different recipients.
The mintBatch() function is triggered by providing token_id in the mint request.
It's important to note that every minting request through the Minting API must include an internal, unique reference_id. Once a mint is successful, this reference_id cannot be reused for additional mints within the same collection. reference_id and token_id can be the same value.
- SDK
- API
const chainName = 'imtbl-zkevm-testnet';
const contractAddress = CONTRACT_ADDRESS;
const response = await client.createMintRequest({
  chainName,
  contractAddress,
  createMintRequestRequest: {
    assets: [
      {
        owner_address: RECIPIENT_ONE,
        reference_id: REFERENCE_ID_ONE,
        token_id: TOKEN_ID_ONE,
        metadata: {
          image:
            'https://immutable.github.io/sample-project-metadata/tokens/token1.webp',
          animation_url: null,
          youtube_url: null,
          name: 'Test zkEVM NFT #1',
          description:
            'This NFT is my first zkEVM NFT created on Immutable',
          external_url: null,
          attributes: [
            {
              trait_type: 'Hat',
              value: 'Top Hat',
            },
            {
              trait_type: 'Coat',
              value: 'Tails',
            },
            {
              trait_type: 'Neck',
              value: 'Bow Tie',
            }
          ]
        }
      },
      {
        owner_address: RECIPIENT_TWO,
        reference_id: REFERENCE_ID_TWO,
        token_id: TOKEN_ID_TWO,
        metadata: {
          image:
            'https://immutable.github.io/sample-project-metadata/tokens/token2.webp',
          animation_url: null,
          youtube_url: null,
          name: 'Test zkEVM NFT #2',
          description:
            'This NFT is my second zkEVM NFT created on Immutable',
          external_url: null,
          attributes: [
            {
              trait_type: 'Hat',
              value: 'Top Hat',
            },
            {
              trait_type: 'Coat',
              value: 'Tails',
            },
            {
              trait_type: 'Neck',
              value: 'Bow Tie',
            }
          ]
        }
      }
    ]
  }
});
POST {baseURL}/v1/chains/{chain_name}/collections/{contract_address}/nfts/mint-requests
5.2.4: Checking the status of the mint
Execute the following command to check the status of the mint request:
- SDK
- API
const chainName = 'imtbl-zkevm-testnet';
const contractAddress = CONTRACT_ADDRESS;
const referenceId = REFERENCE_ID_ONE;
const response = await client.getMintRequest({chainName, contractAddress, referenceId});
GET {baseURL}/v1/chains/{chain_name}/collections/{contract_address}/nfts/mint-requests/{reference_id}
If the status in the results is "pending", wait a few seconds and try again. Once the mint is successful, the status will change to "succeeded".
The returned results should resemble the following sample, with the status indicating "succeeded" to confirm the successful mint.
{
    "page": {
        "next_cursor": null,
        "previous_cursor": null
    },
    "result": [
        {
            "chain": {
                "id": "eip155:13473",
                "name": "imtbl-zkevm-testnet"
            },
            "collection_address": "0xe2e94d611d50370612e9721254807b7874093fb6",
            "created_at": "2024-02-12T05:35:35.743242Z",
            "error": null,
            "owner_address": "0x68209e7086032941a8Cb14352c2F43b086288791",
            "reference_id": "REFERENCE_ID_ONE",
            "status": "succeeded",
            "token_id": "TOKEN_ID_ONE",
            "activity_id": "4e28df8d-f65c-4c11-ba04-6a9dd47b179b",
            "transaction_hash": "0x6890c450a43e6f3e90b311e2c0e80e1e6880cbc93ab977fc5357ac66cd255800",
            "updated_at": "2024-02-12T05:35:35.743242Z"
        },
    ]
}
Immutable has provided server-side code samples here to accelerate your integration with the Minting API. Implementing this template will enable your game to mint at scale. We recommend thoroughly testing the samples with your game and making any necessary amendments specific to your game before deploying on Mainnet.
Below is an example assuming the use of Postgres and Fastify.
Prerequisites
5.3.1 Prep
# please use node.js version >= 20
mkdir minting-backend-sample && cd minting-backend-sample && npm init
# minting backend is under alpha at the moment.
npm i @imtbl/sdk pg fastify uuid
npm i typescript @types/uuid @types/pg ts-node-dev --save-dev
npx tsc --init
5.3.2 Setup minting persistence for Postgres
import Fastify, { FastifyReply, FastifyRequest } from 'fastify'
import { mintingBackend, config } from '@imtbl/sdk';
import { Pool } from 'pg';
import { v4 as uuidv4, parse } from 'uuid';
import 'dotenv/config'

const fastify = Fastify({
  logger: true
});

// setup database client
const pgClient = new Pool({
  user: process.env.PG_USER || 'postgres',
  host: process.env.PG_HOST || 'localhost',
  database: process.env.DB_NAME || 'minting_backend',
  password: process.env.PG_PASSWORD || 'password',
  port: 5432,
});

// persistence setup for minting backend
const mintingPersistence = mintingBackend.mintingPersistencePg(pgClient);

const minting = new mintingBackend.MintingBackendModule({
  baseConfig: {
    environment: config.Environment.SANDBOX,
    apiKey: process.env.IM_API_KEY,
  },
  persistence: mintingPersistence,
  logger: console,
});
5.3.3 Record minting request as they come in
Recording minting requests will make sure that the minting process is resilient to server crash and network failures.
interface MintRequest {
  mintTo: string;
}

// mint route
fastify.post('/mint', async (request: FastifyRequest<{ Body: MintRequest }>, reply: FastifyReply) => {
  const collectionAddress = process.env.COLLECTION_ADDRESS as string;
  const assetId = uuidv4();
  const assetIdBuffer = parse(assetId);
  const mintTo = request.body.mintTo;
  const metadata = {
    name: 'My NFT',
    description: 'This is my first NFT',
    image: 'https://placehold.co/600x400',
  };

  await minting.recordMint({
    asset_id: assetId,
    contract_address: collectionAddress,
    owner_address: mintTo,
    metadata,
    // amount: 5, // for 1155 only
    // token_id: Buffer.from(assetIdBuffer).readUint32BE(0).toString(10), // required for 1155 only. 721 can omit this.
  });
  reply.send({});
});
5.3.4 Add webhook handler
const url = "/api/process_webhook_event" // Set this url on the wbehook config screen in hub.immutable.com
fastify.post(url, async (request: FastifyRequest<any>, reply: any) => {
  await minting.processMint(request.body as any);
  reply.send({ status: "ok" });
});
5.3.5 Submitting mints asynchronously
/**
 * Run the server!
 */
const start = async () => {
  try {
    await fastify.listen({ port: 3000, host: "0.0.0.0" })

    // long running process to submit minting requests
    await minting.submitMintingRequests({});

  } catch (err) {
    fastify.log.error(err)
    process.exit(1)
  }
}
start();
5.3.6 Run it locally
5.3.6.1 Add db schema file
At root of your project, create a seed.sql file with contents below.
CREATE EXTENSION IF NOT EXISTS "uuid-ossp";

CREATE TABLE IF NOT EXISTS im_assets (
  id UUID PRIMARY KEY DEFAULT gen_random_uuid(),
  asset_id UUID NOT NULL,
  owner_address varchar NOT NULL,
  metadata jsonb,
  token_id varchar NULL,
  contract_address varchar NOT NULL,
  error varchar NULL,
  -- NOTE: minting_status is purposely not an enum for ease of future expansion without running a migration
  minting_status varchar NULL,
  metadata_id UUID NULL,
  tried_count INT DEFAULT 0,
  last_imtbl_zkevm_mint_request_updated_id UUID NULL,
  created_at TIMESTAMP DEFAULT CURRENT_TIMESTAMP,
  updated_at TIMESTAMP DEFAULT CURRENT_TIMESTAMP
);

CREATE UNIQUE INDEX IF NOT EXISTS im_assets_uindex ON im_assets (asset_id, contract_address);
The same file is hosted here.
5.3.6.2 Start postgres in docker
# at root of the project

docker run --name minting-backend-pg \
  -p 5432:5432 \
  -e POSTGRES_PASSWORD=password \
  -e POSTGRES_USER=postgres \
  -e POSTGRES_DB=minting_backend \
  -v $(pwd)/seed.sql:/docker-entrypoint-initdb.d/seed.sql \
  -d postgres
5.3.6.3 Expose port to internet for incoming webhook request
You can use services like below to expose local ports.
Please make sure the URL exposed is set up in the webhook section on Immutable Hub. Since in this example we are using the /api/process_webhook_event route, the full URL for the webhook will be https://your-exposed-url/api/process_webhook_event.
Refer to Setup - Webhooks for more information on how to set up webhooks.
5.3.6.4 Run Fastify server
Replace the collection address and API key in the command below from your project in Immutable Hub.
COLLECTION_ADDRESS=0x0000 IM_API_KEY=XXXXX npx ts-node-dev --respawn --transpile-only index.ts
This will start a fastify server at port 3000.
Make sure to trigger the confirmation event on webhook page via Immutable Hub if you have missed it the first time.
5.3.7 Mint
Replace YOUR_WALLET_ADDRESS with your NFT recipient's wallet address. You can get a random eth address from here.
curl -X POST -H "Content-Type: application/json" -d '{"mintTo": "YOUR_WALLET_ADDRESS"}' http://localhost:3000/mint
Corresponding logs will appear in the terminal that started the Fastify server. The im_assets table in the database should be able to show the status of above mint request.
5.3.8 Check the NFT
Replace the contract address in the below url (Immutable Testnet Explorer) and open it in your browser
https://explorer.testnet.immutable.com/token/{YOUR_CONTRACT_ADDRESS}
You can also check the status of the mint request in the im_assets table minting_status column.
Immutable also exposes the status on mint requests through this endpoint that you can query.
5.3.9 More sample code
The complete example is available at here.
Another example for a free mint backend (using Sqlite) + frontend (fastify) app is here.
Immutable's recommended ERC721 preset contract has multiple batch minting strategies tailored for different minting scenarios, which can save significant gas costs while minting.
5.4.1: Set up your project backend (Node.js)
We have already created a sample project which you can clone to mint quickly and easily:

Basic Preset Minting
git clone https://github.com/immutable/basic-preset-minting
cd basic-preset-minting
npm i
5.4.2: Grant minting permissions
Minter Address field this will already have been done for you. If not, you can follow the steps below.To mint NFTs, we need to use our "owner" wallet (which deployed our contract) to grant another wallet minting rights for our collection. In this tutorial, we're going to add the "minter" role to our existing "owner", so you don't need to set up a new wallet.
First, we will need to export your owner wallet's private key so it can be used in local scripts.
5.4.2.1 Locate your wallet's private key
- Open Metamask
- Make sure the network at the top of the screen is the test network you wish to deploy to
- Open Account details by clicking on the following button and selecting
Account details
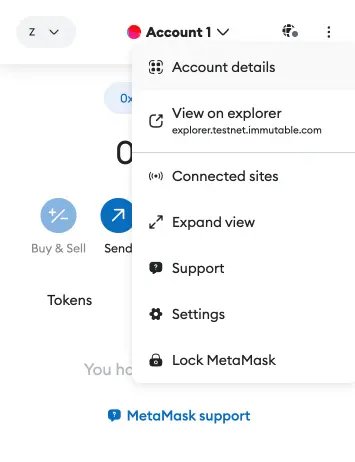
- Select
Show Private Keyand enter your password - Copy the long string provided (your private key) as this will be needed in the next step.
5.4.2.2 Add your private key to the .env file
We now need to configure your project with your private key in order to grant it the requisite authorisation to mint tokens. First, copy the code in .env.sample into a new .env file. Next, add the two variables below - the remaining variables will be set later:
CONTRACT_ADDRESS- The contract address of your collection - you can find this on Immutable Hub.OWNER_PRIVATE_KEY- The private key you exported.
5.4.2.3 Perform the role grant
To complete the grant, simply run the following script:
npm run grant-role
5.4.3: Minting directly via the collection's mint function
To mint our first NFTs, we're once again going to use a sample script from the repository we cloned earlier. In the sample script, we mint 3 NFTs and distribute them to 2 recipient wallets - you can change this to suit your requirements.
All we need to do is ensure the remaining variables are now set in our .env file:
MINTER_PRIVATE_KEY- The private key of the wallet we just granted the minter role (may be same as Owner Private Key)RECIPIENT_ONE- The first address of the wallet that will own the NFTs being minted in the batchRECIPIENT_TWO- The second address of the wallet that will own the NFTs being minted in the batch
Now all that's left is to execute the mint itself:
npm run mint
6: Have Immutable verify your assets
Once you've deployed your collection or token, Immutable recommends all games verify their asset contracts, as it enhances player and trader confidence in engaging with transactions involving verified assets. For detailed information about Immutable's asset verification procedures, please refer to this guide.
To verify your assets do the following:
- Verify your contract via Immutable's explorer. For more information on verifying your smart contract on Immutable's Explorer check out this guide.
- In Hub, navigate to your deployed collection and click on it to view the details. Click the
Verify with Immutablebutton located in the top right-hand corner.
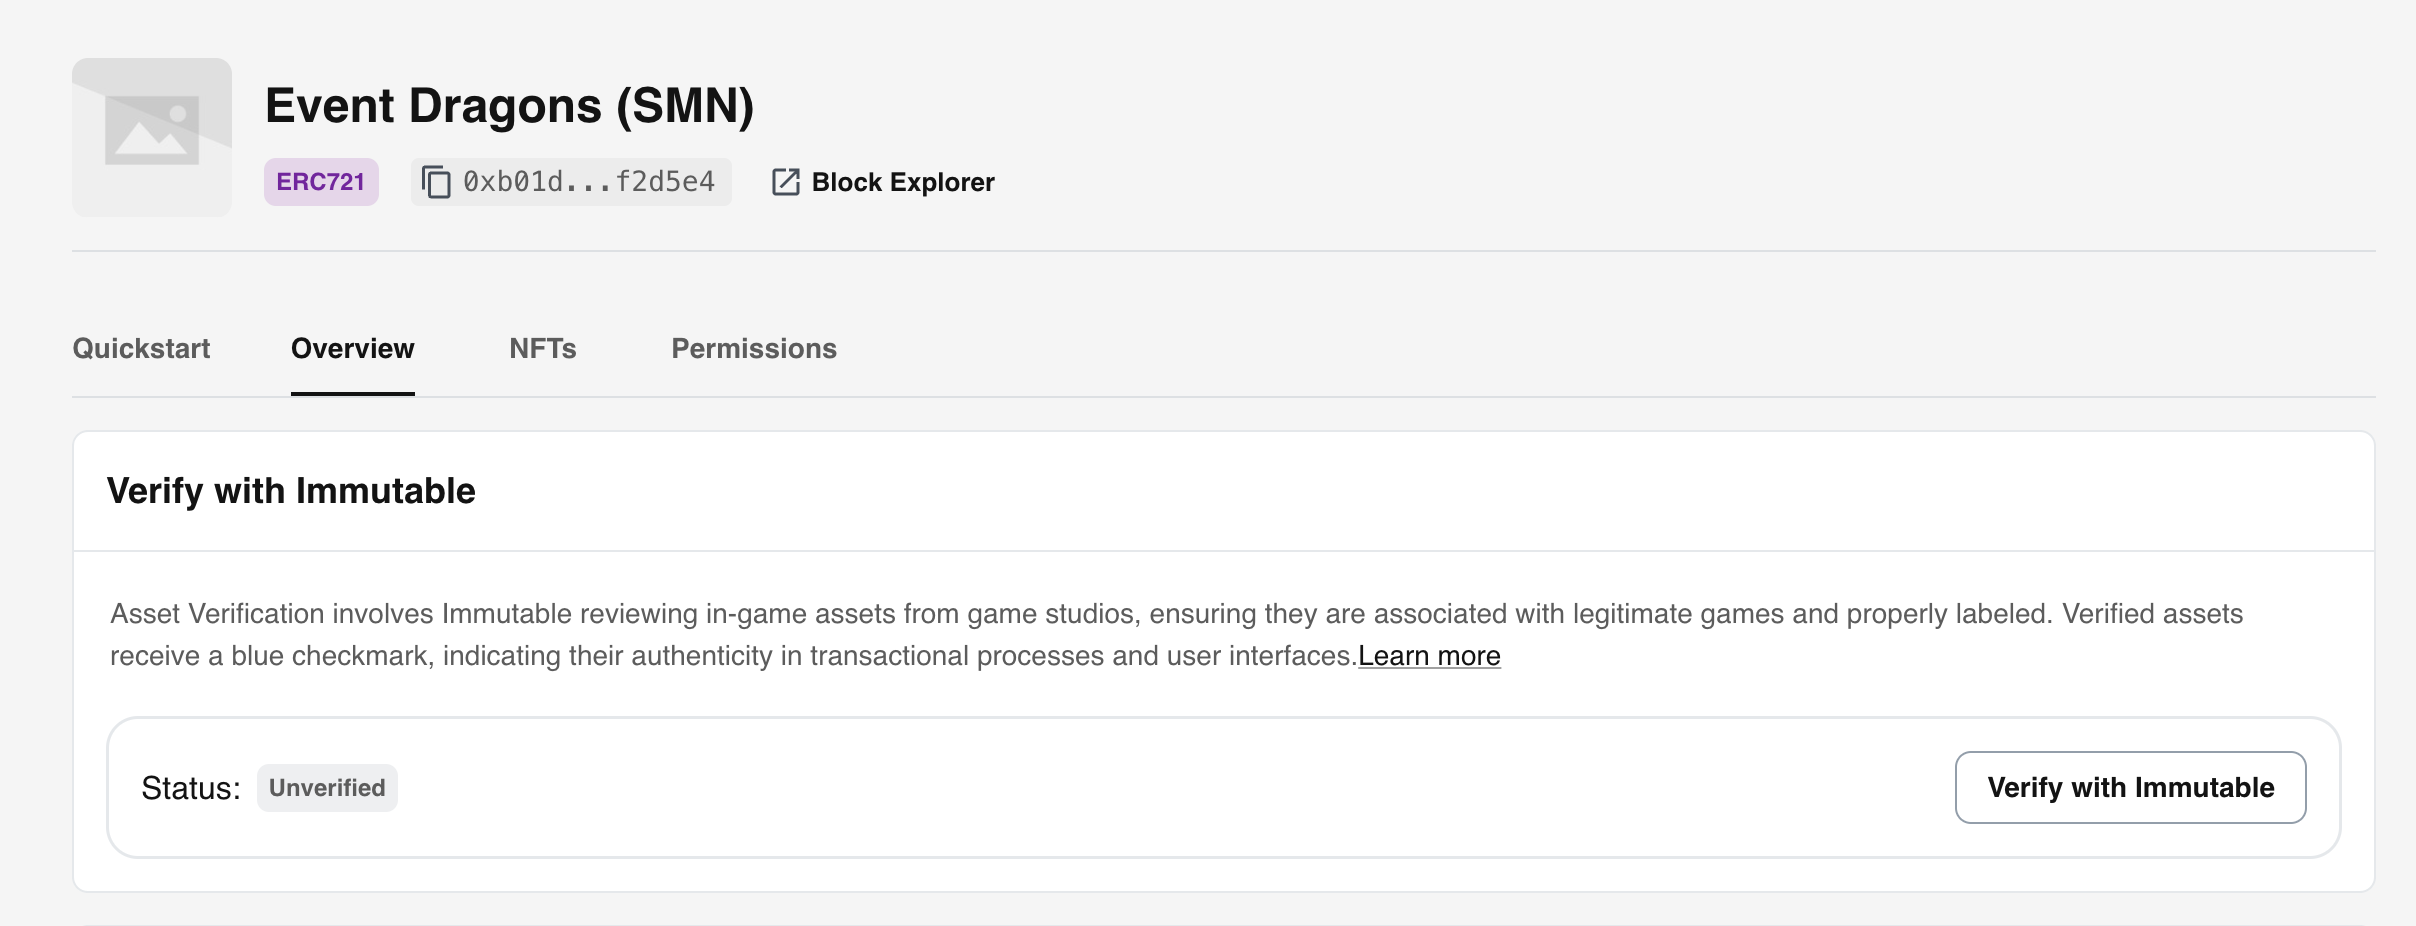
- Immutable will review your request and assign a verification status. Once this process is complete, your collection will display the assigned verification status.
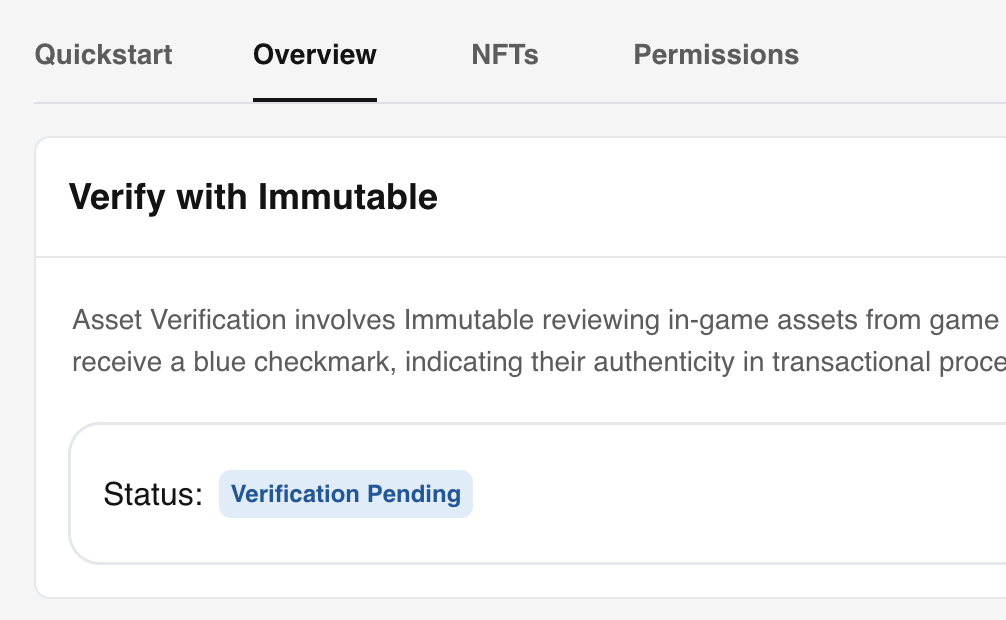
If you deploy an erroneous collection on mainnet, please inform your Immutable account manager or raise a ticket with our Developer Support team to have the collection labeled as Inactive. This status will indicate to your gaming community and marketplaces that the assets associated with this collection should be ignored.


