Bridge tokens
The Bridge widget is a drop-in solution for web-based games and marketplaces that simplifies the process of moving tokens from and to the Immutable zkEVM network.
Bridge Overview
- deposit funds to Immutable zkEVM from Ethereum
- withdraw funds from Immutable zkEVM to Ethereum
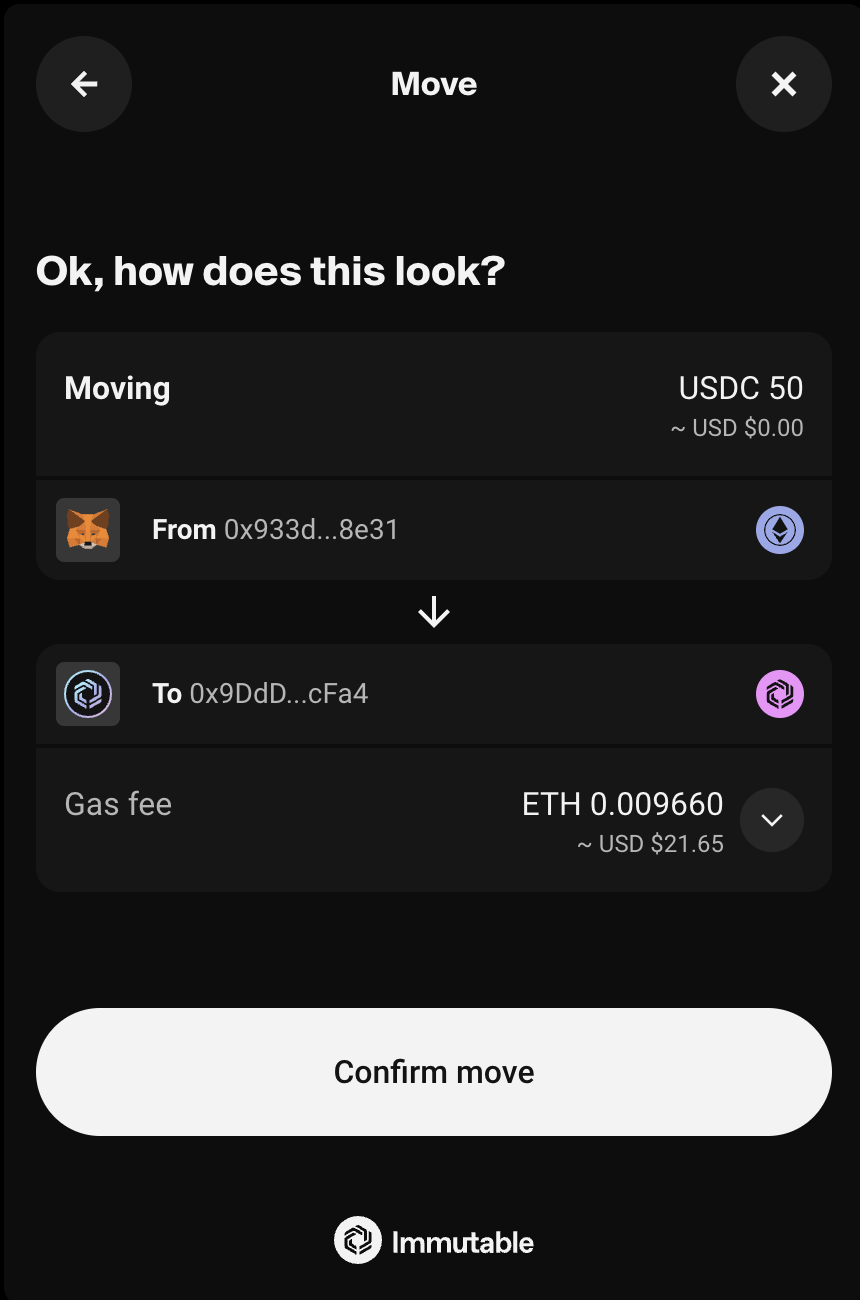
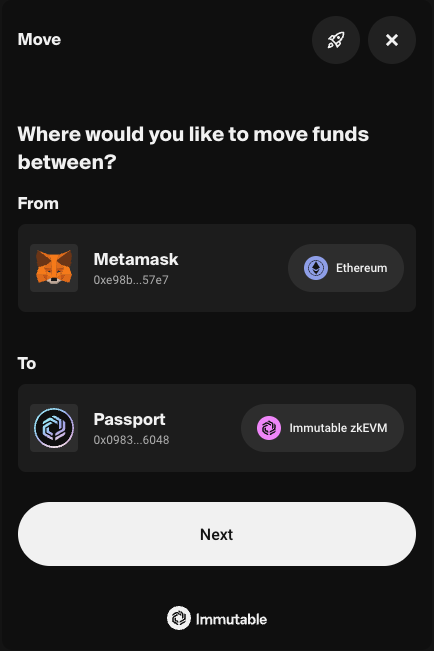
Both deposits and withdrawals can be made across wallet addresses as the user chooses. For instance a user could deposit funds from their MetaMask wallet on Ethereum and choose to receive them in their Passport on Immutable zkEVM.
Once a deposit or withdrawal is made, there will be a processing time of up to ~20 mins. Users can then inspect the progress of their transactions by clicking the rocket icon. Transactions in progress will show for both the wallet address where funds are moving from as well as where they are moving to.
Withdrawals
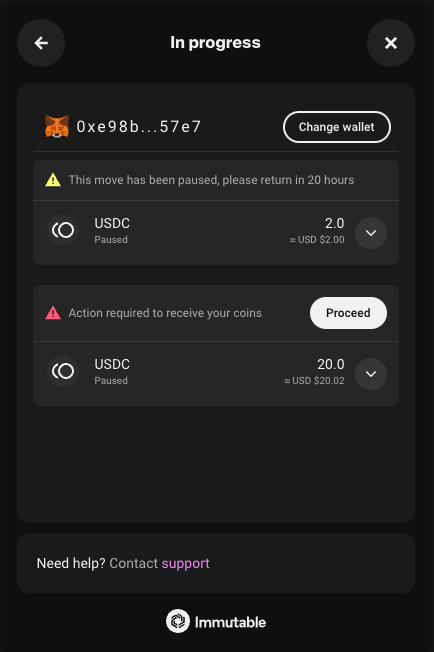
Most withdrawals will be processed within the expected timeframe however there may be circumstances when withdrawals are delayed. If this occurs a user will need to claim their tokens on Ethereum.
1. Flow rate threshold exceeded - the withdrawal volume threshold of a particular token has been exceeded and so all subsequent withdrawals are delayed across all tokens.
2. Large withdrawal threshold exceeded - the withdrawal threshold for a particular token has been exceeded and so all subsequent withdrawals are delayed across all tokens
3. Withdrawal thresholds have not been defined for a specific token - all withdrawals in this token are delayed, withdrawals for other tokens are not affected.
If a withdrawal is delayed, it will be delayed for 24 hours before claiming can be done. It means that the funds have moved to Ethereum, however a separate transaction will need to be signed in order to claim the tokens. When claiming tokens on Ethereum (L1), any wallet can pay the gas required for the claim, however the destination wallet address of the withdrawal will always remain the same. During the claiming process, if a user does not have enough ETH to cover the gas fee, the user will be given the option to connect another wallet to pay the gas.
Getting started
Once you have completed the widget setup, use the WidgetsFactory to create a Bridge widget.
In order to mount the widget, call the mount() function and pass in the id attribute of the target element you wish to mount it to.
- React
- JavaScript
import { useEffect } from 'react';
import { checkout } from '@imtbl/sdk';

// create Checkout SDK
const checkoutSDK = new checkout.Checkout();

export function App() {
  // create Checkout SDK

  // Initialise widgets, create bridge widget and mount
  useEffect(() => {
    (async () => {
      const widgets = await checkoutSDK.widgets({
        config: { theme: checkout.WidgetTheme.DARK },
      });
      const bridge = widgets.create(checkout.WidgetType.BRIDGE);
      bridge.mount('bridge');
    })();
  }, []);

  return <div id="bridge" />;
}
<html>
  <head>
    <!-- Load the SDK from jsdelivr -->
    <script src="https://cdn.jsdelivr.net/npm/@imtbl/sdk/dist/browser/checkout/sdk.js"></script>
  </head>
  <body>
    <div id="bridge"></div>
    <script>
      // Initialize Checkout SDK
      var checkout;
      (async function () {
        checkout = new ImmutableCheckout.Checkout();

        const widgets = await checkout.widgets({
          config: { theme: ImmutableCheckout.WidgetTheme.DARK },
        });

        const bridge = widgets.create(ImmutableCheckout.WidgetType.BRIDGE);

        bridge.mount('bridge');
      })();
    </script>
  </body>
</html>
Parameters
The mount() function can also take in parameters to be passed into the widget.
Parameters are treated as transient and will be reset after the widget is unmounted.
| Parameter | Description |
|---|---|
tokenAddress | The contract address of the token to bridge. This will prefill the token field in the form. |
amount | The token amount to bridge. This will prefill the amount field in the form. |
walletProviderName | The wallet provider name to use for the Bridge widget. |
- React
- JavaScript
import { checkout } from "@imtbl/sdk";

// @ts-ignore
const bridge = widgets.create(checkout.WidgetType.BRIDGE,
  { config: { theme: checkout.WidgetTheme.DARK }}
);

// When calling the mount function, pass in the parameters to use
bridge.mount('bridge', { fromTokenAddress: '0x123', amount: '10' })
// When calling the mount function, pass in the parameters to use
bridge.mount("bridge", { defaultTokenAddress: '0x123', amount: '10' });
Configuration
When you first create the widget, you can pass an optional configuration object to set it up. For example, passing in the theme will create the widget with that theme. If this is not passed the configuration will be set by default.
Configuration will persist after the widget is unmounted. You can always update a widget's configuration later by calling the update() method.
| Property | Description |
|---|---|
BridgeWidgetConfiguration | The configuration type to be used with the Bridge widget. |
- React
- JavaScript
import { checkout } from "@imtbl/sdk";

//@ts-ignore When creating the widget, pass in the configuration
const bridge = widgets.create(checkout.WidgetType.BRIDGE,
  { config: { theme: checkout.WidgetTheme.DARK }}
);

// Update the widget config by calling update()
bridge.update({ config: { theme: checkout.WidgetTheme.LIGHT }});
// When creating the widget, pass in the configuration
const bridge = widgets.create(ImmutableCheckout.WidgetType.BRIDGE,
  { config: { theme: ImmutableCheckout.WidgetTheme.DARK }}
);

// Update the widget config by calling update()
bridge.update({ config: { theme: ImmutableCheckout.WidgetTheme.LIGHT }});
For more information on the configurations across all the Checkout Widgets (e.g. theme) review the Configuration section in our Setup page.
Events
Bridge widget events are emitted when critical actions have been taken by the user or key states have been reached. Below is a table of the possible events for the Bridge widget.
| Event Type | Description | Event Payload |
|---|---|---|
BridgeEventType.TRANSACTION_SENT | A user successfully sent their transaction for bridging. | BridgeTransactionSent |
BridgeEventType.FAILURE | There was a problem when bridging the tokens. | BridgeFailed |
BridgeEventType.CLOSE_WIDGET | The user clicked the close button on the widget. This should usually be wired up to call the widget's unmount() function. |
- React
- JavaScript
You can use the addListener() function to tap into the events and provider handlers. Use the removeListener() function to stop listening to that event.
import { checkout } from "@imtbl/sdk";

// @ts-ignore
const bridge = widgets.create(checkout.WidgetType.BRIDGE,
  { config: { theme: checkout.WidgetTheme.DARK }}
);

// add event listeners for the bridge widget
bridge.addListener(checkout.BridgeEventType.TRANSACTION_SENT, (data: checkout.BridgeTransactionSent) => {
  console.log("success", data);
});

bridge.addListener(checkout.BridgeEventType.FAILURE, (data: checkout.BridgeFailed) => {
  console.log("failure", data);
});

bridge.addListener(checkout.BridgeEventType.CLOSE_WIDGET, () => {
  bridge.unmount();
});

// remove event listeners for the bridge widget
bridge.removeListener(checkout.BridgeEventType.TRANSACTION_SENT);

bridge.removeListener(checkout.BridgeEventType.FAILURE);

bridge.removeListener(checkout.BridgeEventType.CLOSE_WIDGET);
You can use the addListener() function to tap into the events and provider handlers. Use the removeListener() function to stop listening to that event.
// add event listeners for the bridge widget
bridge.addListener(ImmutableCheckout.BridgeEventType.TRANSACTION_SENT, (data) => {
  console.log('success', data);
});

bridge.addListener(ImmutableCheckout.BridgeEventType.FAILURE, (data) => {
  console.log('failure', data);
});

bridge.addListener(ImmutableCheckout.BridgeEventType.CLOSE_WIDGET, (data) => {
  console.log('close', data);
});

// remove event listeners for the bridge widget
bridge.removeListener(ImmutableCheckout.BridgeEventType.TRANSACTION_SENT);

bridge.removeListener(ImmutableCheckout.BridgeEventType.FAILURE);

bridge.removeListener(ImmutableCheckout.BridgeEventType.CLOSE_WIDGET);
Sample code
This sample code gives you a good starting point for integrating the Bridge widget into your application and listening to its events.
- React
- JavaScript
import { useEffect, useState } from 'react';
import { checkout } from '@imtbl/sdk';

 // create Checkout SDK
 const checkoutSDK = new checkout.Checkout();

export function App() {
 const [bridge, setBridge] =
 useState<checkout.Widget<typeof checkout.WidgetType.BRIDGE>>();

 // Initialise widgets, create bridge widget
  useEffect(() => {
    (async () => {
      const widgets = await checkoutSDK.widgets({
        config: { theme: checkout.WidgetTheme.DARK },
      });
      const bridge = widgets.create(checkout.WidgetType.BRIDGE, { config: { theme: checkout.WidgetTheme.DARK }})
      setBridge(bridge)
    })();
  }, []);

  // mount bridge widget and add event listeners
  useEffect(() => {
    if(!bridge) return;

    bridge.mount("bridge");

    bridge.addListener(checkout.BridgeEventType.TRANSACTION_SENT, (data: checkout.BridgeTransactionSent) => {
      console.log("success", data);
    });
    bridge.addListener(checkout.BridgeEventType.FAILURE, (data: checkout.BridgeFailed) => {
      console.log("failure", data);
    });
    bridge.addListener(checkout.BridgeEventType.CLOSE_WIDGET, () => {
      bridge.unmount();
    });
  }, [bridge])


  return (<div id="bridge" />);
}
<html>
  <head>
    <!-- Load the SDK from jsdelivr -->
    <script src="https://cdn.jsdelivr.net/npm/@imtbl/sdk/dist/browser/checkout/sdk.js"></script>
  </head>
  <body>
    <div id="bridge"></div>
    <script>
      // Initialize Checkout SDK
      var checkout;
      (async function () {
        checkout = new ImmutableCheckout.Checkout();

        const widgets = await checkout.widgets({
          config: { theme: ImmutableCheckout.WidgetTheme.DARK },
        });

        const bridge = widgets.create(ImmutableCheckout.WidgetType.BRIDGE, { config: { theme: ImmutableCheckout.WidgetTheme.DARK }});

        bridge.mount('bridge');

        bridge.addListener(ImmutableCheckout.BridgeEventType.SUCCESS, (data) => {
          console.log('success', data);
        });

        bridge.addListener(ImmutableCheckout.BridgeEventType.FAILURE, (data) => {
          console.log('failure', data);
        });

        bridge.addListener(ImmutableCheckout.BridgeEventType.CLOSE_WIDGET, () => {
          bridge.unmount();
        });
      })();
    </script>
  </body>
</html>